
Making sure your or your child’s cochlear implant system is properly set up helps to ensure it delivers the best possible sound. Chatting with friends and family, talking on the phone, or listening to your favorite songs or TV shows are all fun, rewarding hearing moments. To help make it easier for you or your child to enjoy these moments to the fullest, use the following guides when setting up your cochlear implant system and connecting to battery-powered consumer electronic devices.
Follow these steps to set up and check that your Naída CI processor is working properly:
Assemble the Universal Headpiece (UHP): Snap the UHP Color Cap into place and connect the UHP to the UHP Cable. Push the cable connector firmly into the headpiece connector and then place the cable in the processor port located below the program button. Push in firmly.
Connect the T-Mic™ 2 microphone/Earhook to the processor: Using the pin removal tool, push the pin to one side of the processor (the pin will not be completely removed), align the T-Mic 2 or Earhook flush with the front of the processor. Using a flat side of the pin removal tool, push the pin back into the processor until it is flush with the side of the processor.
Insert batteries into the BatteryPak If using the Zinc-Air cartridge, push the lever on the cartridge until the drawer releases. Pull the drawer out of the cartridge and place two Zinc-Air batteries into the battery drawer, positive (+) side up. Gently slide the battery drawer back into the cartridge.
Attach the PowerCel™ battery: Align and gently slide the battery into place until you hear or feel a click.
Ensure that the processor is in a comfortable position behind the ear or at your preferred wearing location.
Ensure that the UHP is positioned over the internal implant (you will feel the magnetic attraction).
Perform a behavioral listening check, using the Ling Six sounds or another listening activity.
If you experience any difficulty setting up your processor and there are no obvious signs of damage, continue on to the troubleshooting guidelines for your sound processor. If there are visible signs of damage to any part of your sound processor system, contact Customer Service to order replacement equipment.
myNaída CI app for Android

Follow these steps to set up and check that your Neptune™ processor is working properly:
Assemble the Universal Headpiece (UHP): If using the UHP, snap the UHP Color Cap into place and connect the UHP to the UHP Cable. Push the cable connector firmly into the headpiece connector and then place the cable pin in the processor port located below the program button. Push in firmly.
Assemble the AquaMic™ headpiece: If using the Neptune processor for swimming, bathing or any other water-based activities, you will need to remove the Neptune Connect, attach your Neptune Color Cover, and use the AquaMic headpiece. Snap the Color Cap into place and connect the AquaMic headpiece to the AquaMic cable. Push the cable connector firmly into the headpiece connector and then place the cable pin in the processor port. Push in firmly.
Insert the battery: Remove the battery cover. Insert one AAA battery, making sure it is properly oriented. Replace the battery cover.
Turn on the Neptune processor: Press and hold the On/Off button for 1-2 seconds. The LED within the button should flash to indicate the battery charge. To turn off the processor, press and hold the On/Off button for 1-2 seconds. The orange LED will fade out to indicate that the processor is powering down.
Ensure that the Neptune processor is in a comfortable position at your preferred wearing location.
Ensure that the headpiece is positioned over the internal implant (you will feel the magnetic attraction).
Perform a behavioral listening check, using the Ling Six sounds or another listening activity.
If you experience any difficulty setting up your processor and there are no obvious signs of damage, continue on to the troubleshooting guidelines for your sound processor. If there are visible signs of damage to any part of your sound processor system, contact Customer Service to order replacement equipment.
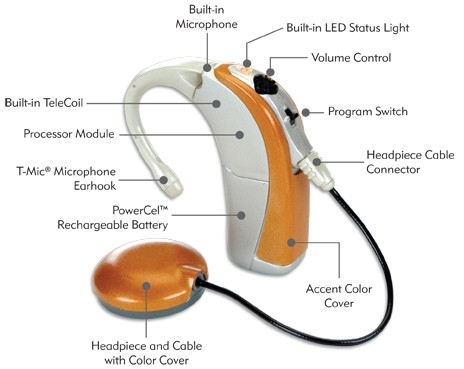
Follow these steps to set up and check that your Harmony™ processor is working properly:
Slide a fully charged PowerCel™ battery onto the processor module. This will turn on the Harmony sound processor. Check to ensure that the PowerCel battery is in a fully aligned position with the processor module and that the PowerCel battery is charged by verifying that the visual indicator (LED) sequence displays three to four quick orange blinks.
Position the Accent Color Cover over the Harmony processor and snap into place.
Make sure that the headpiece cable is plugged into the processor module. Verify that the cable is not twisted or frayed.
Align and gently snap into place the selected Earhook. Check to verify that the Earhook is properly positioned. To remove the Earhook, turn in either direction until the Earhook releases from the post.
Verify that the program selector and Volume Control are in the desired positions.
Ensure that the processor is in a comfortable position behind the ear or at your preferred wearing location.
Ensure that the headpiece is positioned over the internal implant (you will feel the magnetic attraction).
Perform a behavioral listening check, using the Ling Six sounds or another listening activity.
If there are no obvious signs of damage, continue on to the troubleshooting guidelines for your sound processor. If there are visible signs of damage to any part of your sound processor system, contact your Regional Advanced Bionics office to order replacement equipment.
Download Harmony Product Guide
Advanced Bionics understands how important telephones are for wishing “happy birthday” to a long-distance family member, letting a coworker know you are running late, or calling for help in an emergency.
The Naída CI includes the DuoPhone feature. When using a phone, this unique Phonak feature automatically streams the caller’s voice directly to both implanted ears for hearing in stereo and easier phone conversations.
The Naída CI processor also features the T-Mic™ 2 microphone. As the industry’s only microphone placed at the opening of the ear canal, the T-Mic picks up sound from a natural position, allowing you to hold a telephone to your ear for convenience and comfort.
The EasyCall Accessory is a unique wireless accessory that attaches to and streams from any brand of Bluetooth-enabled cell phone or smart phone directly to your Naída CI processors (or a Naída CI processor and compatible Phonak hearing aid) while reducing noise, for unmatched sound quality and speech understanding.
The DECT Phone is a powerful wireless transmitter that looks and works just like a regular cordless landline phone. It also transmits sound to both your Naída CI processors (or a Naída CI processor and compatible Phonak hearing aid), reducing noise and maximizing understanding.
The versatile Roger™ Pen streams a speaker’s voice directly to a design-integrated Roger™ 17 receiver on your Naída CI sound processor. It can be used to stream cellphone calls or listening to TV and other multimedia.
The ComPilot accessory allows phone calls (and endless other media) to be wirelessly streamed to one or two Naída CI processors or a Naída CI processor and a compatible Phonak hearing aid at the same time.
Detailed tips and instructions are available in English for help with using a landline, cordless, or cellular telephone with your AB cochlear implant system.

If you experience any difficulties after following these tips, please contact Customer Service for further assistance.
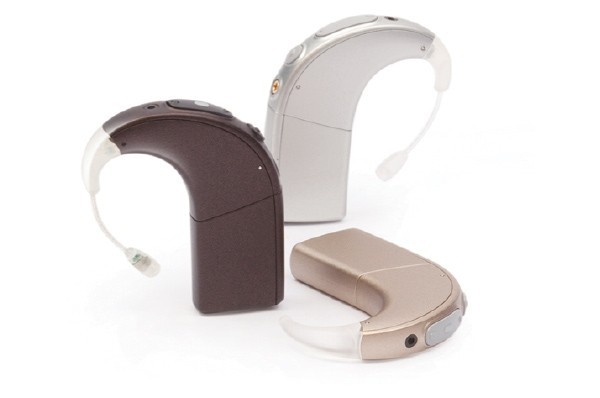
• Naída CI Sound Processor
• Neptune Sound Processor
• Harmony Sound Processor

Many cochlear implant recipients enjoy listening to music.
NOTE: AB strongly recommends that the Auxiliary Audio Cable only be used with battery-operated devices.
The Naída CI Sound Processor accessories include industry-leading technology that instantly connects you or your child to media players and countless other devices.
The Roger™ system includes a design-integrated receiver that connects to your Naída CI processor and streams audio from the Roger™ Pen, a versatile microphone that can also be used to stream crystal-clear audio from cell phones, the TV, and other multimedia.
The Phonak ComPilot wireless streaming accessory offers wireless features and functionality that link you seamlessly to Bluetooth products, media players, mobile phones, computers, TVs and other consumer electronics.
The Naída CI processor also features the T-Mic™ 2 microphone. As the industry’s only microphone placed at the opening of the ear canal, the T-Mic 2 microphone picks up sound from a natural position, allowing you to enjoy earbuds and headphones like everyone else. The T-Mic is an optional earhook and is the standard choice for most adult cochlear implant recipients.
The Neptune Sound Processor comes compatible with convenient features and accessories to help you easily connect to MP3 players, cell phones and other popular consumer electronic devices.
The T-Comm™ accessory delivers the natural placement of the T-Mic™ microphone and lets Neptune recipients wirelessly use earbuds, headphones, cell phones and other audio devices.
Neptune Connect enables instant, direct access to MP3 players, FM systems and many popular consumer electronics.
The Harmony Sound Processor uses the T-Mic microphone to make listening to your portable music player simple. As the industry’s only microphone placed at the opening of the ear canal, the T-Mic picks up sound from a natural position, allowing you to enjoy earbuds and headphones like everyone else. The T-Mic is an optional earhook and is the standard choice for most adult cochlear implant recipients.
AB offers a Direct Connect™ Earhook, Direct Connect Cable, and an Audio Interface Cable. Together, these accessories allow you to connect Harmony processors directly to portable music players. Simply attach the Direct Connect Earhook to the sound processor and connect the Direct Connect Cable to the Earhook. Connect the Audio Interface Cable at one end to that cable and the other to a portable music player.
If you’re still experiencing any difficulties after following these tips, please contact the Advanced Bionics office in your region for further assistance.
Staying connected to family and friends over the telephone, or listening to your favorite music on consumer audio devices, can be rewarding experiences for cochlear implant recipients. AB has a full line of accessories to make sure you or your child can connect as conveniently and effortlessly as possible.
LET'S TALK
NEXT SECTION